 |
 |
 |
||||||||||||
Table of Contents:
Preparing Your Studio For Beveling Space | Working Tables | Tools Space - You will need room for both a small machine table and a large open working table for handling and cutting sheet plate glass. This space should have a water source, or be within connection distance of a water source, preferably a garden hose connection. This room should have a good supply of natural light. If natural light is not available, it will be necessary to put in a good source of light from both overhead lights and clamp-on or utility lamps placed strategically around your machines. Another detail about this space that would be beneficial, especially considering that beveling can be messy, is a washable floor; painted or sealed concrete, linoleum, tile or a painted or sealed wood floor. Carpeting is not a good idea due to the water. All good floors for beveling are hard floors, so a set of thick rubber floor pads in front of the machines and other standing areas will save a lot of stress on your back and legs. A shop vacuum for water and dust is very useful to have in a beveling studio. Because the beveling machines will spin cerium and glass dust (while wet) onto walls and ceilings, they need to be cleaned occasionally. To avoid a dirty look on you studio walls, you may consider painting your walls and ceiling a cerium color with enamel paint. The other possibility is to just hang plastic sheets behind your machines. Another important need for this beveling room is electrical supply. These machines run on 115v. They both have a three prong grounded plug. Never remove this third plug. If you don't have grounded receptacles, use a ground adapter and remember to screw on the electrical outlet. Space | Working Tables | Tools Working Tables - The machines you have purchased are table-top models and they spin with some force. If the table is too lightweight, or the legs are not balanced, the rotating machine may create vibration in the table that may seem to be coming from the machine. If your table rocks at all, adjust with appropriate shims. Table height is also a factor. Beveling on the "Disc Drive" is best at roughly waist height and only a few inches higher on the "Up Right." It is easier and safer to reach downward while beveling than at chest height. The actual bevel contact height is approximately 10" (25.40 cm) above the table on both machines. So, to get the table height, subtract 10" (25.40 cm) from your waist height. The main idea here is to keep the working area a safe distance from your face and maintain a grip on your bevel that does not feel awkward or become tiring too quickly. Do not place your machines in any position so that a wet or weak grip on your bevel may send the bevel flying in a direction where another person may be standing. Think about the direction your wheels are turning because this is the direction glass chips and runaway bevels generally fly. Arrange the work location accordingly, making use of walls to act as guards; or if this is impossible, build a tall - AT LEAST 4' (1.2 m) - divider around EACH machine. The second work table, a larger table for plate cutting - 3' x 6' (.9 m x 1.8 m) to 4' x 8' (1.2 m x 2.4 m) or thereabouts - should be a comfortable cutting and breaking height for you. It is also very helpful to cover at least 1/2 its area with a short, tight carpet for plate glass cutting. You will find that scratches on your glass will always be a problem. It is softer than stained glass and scratches more readily. Your awareness of glass handling will sharpen markedly when you make the transition from handling colored sheet glass to heavier clear glass. Sometimes it just seems as though clear glass grows its own scratches. Keep the cutting carpet vacuumed frequently. Space | Working Tables | Tools Tools for your beveling studio are similar to those needed for a stained glass studio.
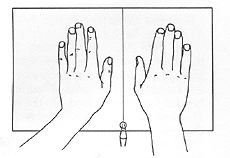
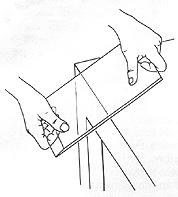
Studio set-up will make a big difference in time spent getting your beveling business up and running. You may choose not to prepare as thoroughly as described here, but do give consideration to the safety issues, even long-term issues such as dust control. It is very important that your beveling work be just as safe as it is fun and profitable. TOP of pageMachine Set-Up Arrange the machines on the table so that the outlets for the cords are well away from the direction of water spray. Next, install the white rubber splash guard. Note that there are two stainless steel clips attached as you insert the splash guard into the housing. These clips are used to retract the splash guard so that it will be out of the way when you are beveling a long piece of glass that extends over the edge of the disc. IMPORTANT SAFETY NOTE: Before you turn on a machine, MAKE SURE there are no loose objects on or near the wheels and shafts of the machine such as nuts and bolts, or more serious things such as hair, long sleeves, or towels hung over your shoulder. We cannot stress how critical this is. These machines bevel glass very fast. Consequently, be aware that they can pull you in or throw something before you realize it. So always be aware of the location of the shut-off switch. Now turn on your machines; not their speed and turning direction. This is the direction water, compounds, and small glass chips (on a current of water) will spin off, if the sponges and water guards are removed. Protective safety goggles should always be worn by persons beveling or by anyone in a beveling area. Plumbing: Water Supply and Drain Systems You have to be concerned with two separate systems. First, the water supply from a water source to the machines. Second, the drains from the machines. For the "water in systems," a plumbing kit is available to custom fit your machine. These kits are designed to connect to a common garden hose connection which makes your plumbing arrangements easy to plan. Also keep in mind that most laundry and utility sinks have faucet mouths that have matching threads to a garden hose. If you would prefer not to hook up to the city water supply, Glastar also offers a pump and bucket as a water supply. Another option is a recirculating system. However, this is not recommended because the glass waste will contaminate polishing wheels. It is always wiser to use a fresh source of water. Now you have a water source coming to the machines. Next is drainage. You have one 8' (2.4 m) length of clear tubing for each drain exit on your machines. The "Disc Drive" connects on the left side, and the two on the "Up-Right" connect behind each wheel. Place the end of each tube in a large bucket on the floor. This is a common type of tubing that you can match at your local hardware store if you need more. Beveling can be very absorbing work, so much so that you can find yourself standing in two inches of water by the time you finish that gorgeous bevel. Pay CLOSE attention to the water level and dump the buckets when about 3/4 full. Use a reasonably sized drain bucket, something that will give you lots of beveling time but that you can handle without spilling when it is almost full. Be careful where you dump the buckets. Glass grit and cerium settle very tightly in drain pipes and, over time, can create problems. TOP of pagePlate Glass Cutting Plate glass cutting is different from cutting thinner glass, primarily because the break not only has to travel along the score but through the thickness of the glass completely. Using even 1/4" (6.35 mm) plate, it may appear that the break is through the entire thickness, but the pieces just don't come apart. If the break hasn't run completely through the thickness, you will probably lose a point when you use the breakers. With this in mind, we will cover the most common ways to break out plate glass. Note: because plate (any thickness) is softer than art glass, it is not necessary to press as hard with your cutter.
What Is The Beveling Process? Typically, beveling is done in four stages, Roughing, Smoothing, Pre-Polish and Final Polish. Roughing - the first stage - is the initial shaping stage. On these machines, 100 grit electroplated diamond is used; the most common grit size for roughing. On the disc, the 100 grit pattern is a series of dots on a purple background. This dot pattern creates a very aggressive grinding surface. On the wheels, the 100 grit pattern is a raised crosshatched pattern which produces an interrupted cutting surface, and this is also very aggressive. This first stage leaves a very rough surface similar to a sandblasted surface. The rouging stage should shape the bevel to within 1/32" (.794 mm) of its final dimension. Smoothing - the second stage - removes all of the deep scratches created in the roughing stage and brings the bevel to its final shape. A good "smoothed" surface is perfectly flat, without facets, satiny in appearance and no sign of scratches. A smooth pattern 400 grit diamond is used for smoothing on the disc. On the wheel, a smooth pattern 600 grit diamond is used. Note that as the particle size gets smaller, the number that specifies its size gets larger. Pre-Polish - the third stage - removes the satin-like finish from the second stage and leaves a slightly hazy surface. Note that in each stage, the beveled surface gets more transparent. This stage removes any facets on the "smoothed" surface. The third stage disc is a resin-bonded fine grit diamond. On the wheel the third stage is a synthetic fiber embedded with a very fine aluminum oxide. Both the wheel and disc require only water. Final Polish - the fourth stage: now we have a beautiful, smooth angle carved all around our "bevel" that is a little hazy or frosted. A mix of cerium oxide and water is generously applied to the white polyester felt disc or the wool felt wheel. The bevel is polished to a high sheen. The "Perfect Bevel" does not happen too quickly, but it is quite reasonable to expect that most people can carve - FREE HAND - a near perfect bevel in a couple of weeks with a few hours of practice each day. Your speed rapidly increases with the number of bevels you do. The polishing stage normally takes 5 times as long as the grinding stage. TOP of pageBevel Dimensions A standard 1/2" (1.27 cm) bevel is measured from the glass, not the face of the bevel. This makes the bevel face a little over 1/2" (1.27 cm). The edge of the bevel ranges from a narrow 1/16" (1.588 mm) thickness to 1/8" (3.175 mm). Therefore, the bevel should fit easily into lead came. Some bevelers prefer the narrower 1/16" (1.588 mm) edge to give the bevel a sharper angle and consequently a richer look. 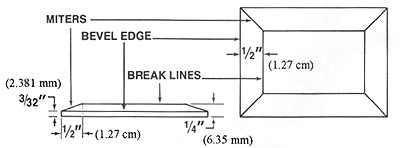 TOP of page Beveling Straight Edges on the "Disc Drive" Roughing | Smoothing | Pre-Polish | Final Polish Place the dot-patterned flat roughing disc on the "Disc Drive" magnetic hub. Before turning the machine on, spin the disc to be certain that it is centered on the locating pin. If it is not the disc will wobble. Adjust the water to a steady stream and turn on the machine. Hold bevel, scored side up, with two hands either with thumbs on top center and index finger on bottom (for a lower-positioned machine), or thumbs on the bottom - remaining fingers on top (for a machine positioned at chest height). HANG ON TIGHT as the glass makes contact with the disc. To begin, put the glass at a 45 degree angle. Get the feel of the grinding disc and your grip before you concern yourself with the actual bevel dimensions. ALWAYS WEAR SAFETY GLASSES WHEN BEVELING. 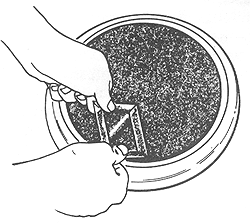
Roughing Once you feel comfortable with the "practice" 45 degree angle, lay the glass down further to approximately 15 degrees to obtain a more traditional bevel angle. Grind until the bevel is 1/2" (1.27 cm). Go slowly though; it is almost too easy to make the bevel too wide. Don't worry if it is wrong; cut another one and try again. As you grind, keep your eye on the distance between the breakline and the bevel edge, keeping the distance parallel at all times. Note: If the right end of your bevel is wider than the left end (common with right-handers), increase the pressure downward on your left hand and vice versa for the opposite problem. Do all movements and pressure changes in fine amounts so that overgrinding does not become a problem; get a sense of fine-tuning your bevel and watch closely as it changes. Keep a short piece of ruler handy; and as you grind, measure the bevel from back of the glass. Stop shy of a 1/2" (1.27 cm) bevel on your roughing wheel by approximately 1/32" (.794 mm). Rough all four sides in any order. Keep them all the same width and angle. All of the miter lines should end up in the corner of the glass. If the miters are a little off (1/16" [1.588 mm] or less), save the adjustment for the Smoothing edge. 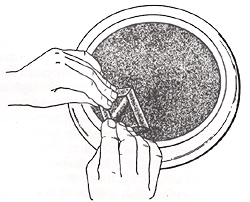
One last note about edge thickness; don't let it get thinner than 1/16" (1.588 mm) as that will make it weak, more prone to chipping, hard to lead and putty, and it will get even thinner in the Smoothing stage. At times, you may wish to bevel straight edges which are 8" (20.32 cm) or more in length. In other words, pieces so long that they extend over the edges of the disc. This is quite tricky and requires some practice. First, arrange the clips on the splash guard as follows. If you visualize the disc as a clock face, then 6 o'clock will be the point closest to you. situate the clips at 4. and 8 o'clock. Simply push the guard down and tuck it under the hook on the clip. You could remove the entire splash guard, but then water would splash in all directions. If you leave the splash guard in place and use the clips to retract the guard in two places there will only be a small amount of water spray from those places. As you grind, move the piece right to left so that the left end moves onto the disc. Then left to right so that the right end moves onto the disc. Keep the piece of glass as horizontal as possible as you move back and forth. Don't grind just in one spot. Move the piece all the way from one side to the other without stopping. continue this motion at a rapid rate. A complete cycle should take less than 3 seconds. If you linger at any point, the edge of the disc will create deep scratches in the glass. Long pieces are tricky and it takes practice. Roughing | Smoothing | Pre-Polish | Final Polish Smoothing Turn off the water. Remove the roughing disc. Put the 400 grit disc on the machine and spin the disc to be certain it is centered. Turn the motor and the water on. As you bring the bevel into contact with the disc, the safest approach is to make contact at a slightly sharper angle (say 20 degrees) and then "slide" down quickly onto the flat bevel surface. With a light touch and practice, your hands can feel that the bevel is in flat contact with the disc. You've figured out the angle for beveling, but your hands may not have committed it to memory. Over time, your hands actually do "memorize" the bevel angle which makes approaching the wheel much smoother. Keep in mind, FIRM grip on the bevel, EASY approach to the wheel. So now you've "re-surfaced" your bevel face on all sides. Dry the bevel off and check by holding the bevel up to the light and look for sparkles or deep wheel marks. If you see any, you just haven't smoothed long enough. Wheel marks can also mean that a glass chip ran under your bevel. This happens once in a while. Rinse the disc to eliminate this. Still some scratches? Smooth a little more and check again. Eventually timing, pressure and angle all come together and all your checking and fussing goes to minimum. Be patient; it DOES come together, just as easily as the first time you make it all the way down the street on your bicycle. It happens just that way, one day you notice all your bevels take less time and thought. Roughing | Smoothing | Pre-Polish | Final Polish Pre-Polish Turn off the water and remove the smoothing disc. Install the rust colored prepolish disc and spin. Turn on the motor and the water. The goal in the prepolish step is to remove the satin finish left from the smoothing step before going to final polish. This pad is great at that. There isn't anything like it on the market for removing unwanted facets from the face of the bevel. Note that the disc tugs at the bevel. Therefore, a strong grip is critical. WATCH THE CORNERS of the bevel. Be very careful not to plant a bevel corner against the direction of rotation. It can fly out of your hands very easily. Roughing | Smoothing | Pre-Polish | Final Polish Final Polish Turn off the water and remove the prepolish disc. Place the disc with the white polyester polishing pad on the machine. Before turning the machine on, turn on the water and saturate the pad. This water layer will, in turn, allow the cerium oxide and water mixture to soak into the disc. This is very important for the prevention of heat cracks. Mix cerium oxide powder and water 50/50 (you may change this ratio as you get used to beveling). Sponge a generous layer of cerium onto the pad. Turn on your water very slowly. Approximately one drip every two seconds. Then turn on the machine and polish bevel. heat cracks are most likely on this step so watch the cerium on the glass. If the cerium starts to dry or cake, the glass may be very close to hear cracking. it's smart, especially at first, to check the temperature of your bevel face at the contact area frequently. Eventually, you will know how warm the bevel surface is by the combination of time spent on the disc and the consistency of the cerium mix. reapply the cerium every few minutes. If cerium does dry on the bevel, it is removed by resetting the pad and polishing it off. Sometimes it dries on so hard a towel won't wipe it off. Allow the bevel to cool a little before polishing off dried cerium. All polished? Dry off your bevel and check for flaws, scratches, pits, etc. Most often flaws can be polished out unless they're very deep. The deep ones should come out by backtracking on step to the prepolish disc, although this is very seldom necessary. For the best quality finish and the overall least amount of time beveling, spend the necessary time at each step eliminating scratches before going on to the next step. Unfortunately, it is difficult to see flaws in a bevel until it has a final polish. Keep visual note of the bevel surface as you practice, trying to catch what"might" be flaws as you go. You will soon develop an "eye" for recognizing a good surface at each bevel stage. The straight edge bevel should be finished now, congratulations! Took awhile? "How can I make any money going this slow?" Practice. Cut out about a dozen small bevels line them up, rough them all at once, then smooth them all and so on. You should notice a significant difference in your production speed after the first "run." Finally, spin dry this disc before putting it away. It will last longer and maintain its shape. A note about beveling "cut off" border pieces. Do the roughing with the smoothing wheel at least at first. Production bevels tend to be a little thicker around the edges so there is less glass to remove. Control is the key here; and at these speeds, cutting happens very fast. The benefit is that it is much easier on your hands. TOP of pageBeveling Outside Curves On The "Disc Drive" The same principles of beveling apply for outside curves (and inside curves for that matter) as for straight edges with one additional problem: the mechanics of grinding curves. Outside curves are done most easily on the "Disc Drive." Use the same flat discs in the same order for outside curves. However, the hand grip and hand movement are different. 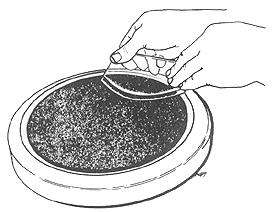
The glass is held with the right hand with the thumb on top, and three fingers on the bottom. The left hand, when possible, helps grasp the bevel and also helps press down on the back of the bevel thus adding control. This grip is just the opposite for lefties. When using the felt and fiber discs, work with the direction of rotation. Do not push against it or the disc may grab the bevel edge and throw it. The movement is done by simply turning the bevel in a circular motion with the right hand maintaining the same contact, angle and pressure as you go, and guiding with the left hand. As you bevel, utilize the full surface of the disc. As you become more comfortable, move the bevel from the center toward the edge; but avoid getting too close to the edge. It may chip the bevel. Keep in mind the 1/2 " (1.27 cm) bevel width and the need to keep it consistent. Watch the thickness of the edge. When doing outside curves, you may find that it saves time to keep the polishing wheels on the "Up Right." Do the roughing and smoothing on the "Disc Drive" and the polishing on the "Up Right." This may also be true for straight edges. Experiment with both machines and find what works best for you. TOP of pageBeveling Inside Curves On The "Up Right" 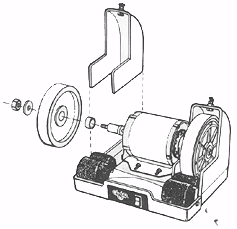
Remove the wheel guards. To do this, pinch the two arms of the guard together and rotate it around the motor shaft and up. Place the two diamond wheels on the "Up Right" using the spacer and washer as shown and tighten the nut. Use a wrench for this, but don't over tighten. Note that the nut on the left side of the machine is a right-hand thread and the other side is a left-hand thread. To install the wheel guards, rotate the arms under the shaft and seat them in the base. To lock them in position, push the arms away from each other (until the little bosses snap into the holes in the base). The diamond surface on the roughing wheel is 100 grit and utilizes a cross hatched pattern which is very aggressive. The smoothing wheel is 600 grit. Make sure the sponges are held in place by the adjustable sponge retainer. They should just barely make contact with the wheel. Make sure no loose objects are near the wheels. Turn on a steady stream of water. Start with a shallow inside curve, say 4" (10.16 cm) radius or so. The tightest radius you will be able to get on an 8" (20.32 cm) wheel is 1 1/2" (3.81 cm). Sets of 4" (10.16 cm) diameter wheels are available which are great for tight curves down to 1/2" (1.27 cm) radius; however, with half the surface area of an 8" (20.32 cm) wheel, they will only last half as long. When designing beveled panels, keep the radii in mind. 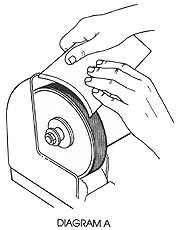
A few keys to inside curves: Imagine a line from your eye (in standing position) to the shaft of the "Up Right." The point at which the glass touches the grinding surface in this line is the contact point of the bevel. If you grind above or below this point, it becomes awkward to see the area being ground and it is also more dangerous. When grinding the bottom part of a bevel (as in Diagram A), the tendency at first is to grind below the contact point. Instead, move the glass up so you are grinding at the contact point. As you lower the glass (as in Diagram B and C), the bottom of the curve swings out to the left and the top point swings toward the wheel. At the point of contact, the edge of the bevel is always parallel to the edge of the wheel. Avoid grinding over the edges of the wheel as this will create gouges in the bevel. This happen frequently at first. Lighten the pressure as you carve the points. There is not much glass left there, and it can disappear quickly. If you are working with a large "C"shaped piece of glass, you may find that the glass runs into the wheel guard. Turn the water off and remove the guard; load the sponge with water and proceed to grind. There should be enough moisture in the sponge to grind for at least a minute. If you see white powder forming on the wheel, add more water to the sponge. 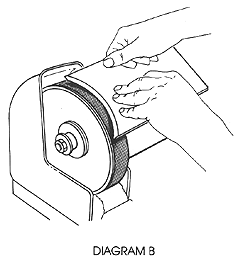
To install the polishing wheels, remove the wheel guards and the diamond wheels along with the spacer and 1 1/2" (3.81 cm) washer. Replace them with the polishing and a 3" (7.62 cm) washer on each side of the wheels. The green-gray prepolish wheel must be "broken in." This is easy, but a bit monotonous. Find a piece of hard wood (oak preferably) about the size of your hand. Turn the machine on. Do not use water. Hold the wood against the wheel with a good deal of force. It must be held with enough pressure so that the wood turns black and begins to smell as though it was burning. This should continue for 10 to 15 minutes. It is now ready to use on glass with water. As it is used, it will develop a "glass glaze" on the surface. After a few hours of use, it will polish much better than it does right after "break in." Be patient with it.
When using the felt wheel, you will find that the glass gets hot very rapidly. If you allow the glass to get too hot, heat cracks will develop. Therefore, it is necessary to remove the glass from the wheel frequently and allow it to cool. You will probably get several cracks at first, but as you become more familiar with the machine, you will learn just how long to polish before removing the glass from the wheel. Allow water to drip slowly on the wheel and apply cerium frequently.
Glastar ~ 8425 Canoga Ave. ~ Canoga Park, CA 91304 ~ U.S.A.
phone: 818.341.0301 · toll-free: 800.423.5635 · fax: 818.998.2078 |
 |
|||||||||||||
|
||||||||||||||

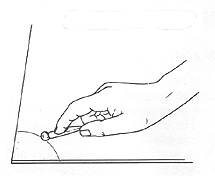
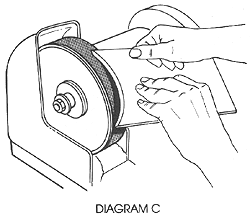 Never polish the points or corners of a bevel by pushing it into the direction of rotation. Turn the bevel upside down to polish the point. Keep your safety glasses on and wear a dust mask.