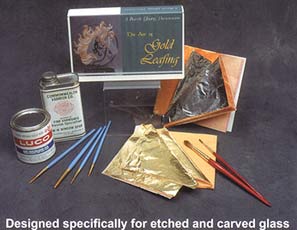
The Art of Gold Leaf Kit - Instructions For Use

Preparation
Clean glass well using mild dish washing liquid and warm water.
Do not use commercial window cleaners. Be sure to protect the
surface of your glass with bumpers or pads.
Applying the Size
Open your can of Size carefully and pour a small amount into a
small container. Immediately reseal the can of Size so that you
do not expose the contents of the can to air any longer than
necessary. Choose an appropriate size of brush for the area to
be covered, and apply an even coat of Size to the carved glass
design.
Cover the carved area completely while being as careful as
possible not to get excess Size outside of the textured area.
Allow the Size to set according to the directions on the can -
approximately 3 hours. In dry climates, it may be slightly less
and in humid areas, somewhat more.
Test for readiness by gently touching the coated area with your
little finger knuckle. You will hear a faint "snick" sound when
the Size has set to the proper tackiness. Now the Size is ready
to receive the Leaf.
Applying the Leaf
Choose a very soft brush (sable or a sable blend) of an
appropriate size for the area to be filled. Gently scrunch up
some Leaf, pick it up on the brush and lay it into the carved
area. Always make sure the brush is covered with the Leaf and
apply with the side of the bristles.
Don't get any Size on this brush, as the brush will get stiff and
be useless for Leafing in the future.
When you have covered all the areas to be gilded, smooth all the
areas again with the side of your brush. Blow off any loose or
excess Leaf, set aside and allow to dry - approximately 8 - 24
hours.
There will probably be pinholes or areas that you have missed.
You can correct this by repeating the first two steps.
Brush excess Leaf off your piece and apply Size, test for tack
("snick"), and then apply Leaf according to these directions.
Then let dry again for approximately 8 to 24 hours.
Sealing
Before applying the Window Spar, you must clean up the edges of
the gilded areas. Using a razor blade, hold the blade as flat as
you can while pushing along the edges of the carved areas.
Gently brush or blow off excess. Open Window Spar can and pour
out a small amount into a paper cup or other small container.
Close the can. Again, choose the appropriate size brush for the
gilded area. For sealing, choose from the nylon brush assortment
included in the kit. Apply a generous, even coat to the gilded
areas. Make sure that the Window Spar doesn't puddle in any area.
Allow to dry completely.
Finishing
When the Window Spar is completely dry, use a razor blade again
to clean up the glass. If there are any areas that are still
stuck, you may use lacquer thinner on a cotton swab. Blot the
cotton swab on a paper towel to remove excess lacquer thinner
before removing these spots.
Work in a well-ventilated area. Be very careful not to breathe
fumes when using lacquer thinner.
The piece may now be cleaned gently with a mild soap and water.
Voila! You've created art!
Leafing Tips
- Always use clear or crystal glass for your carving when you intend to gild it. Gold gild gets a brassy look on green tinted glass
- Practice with less expensive silver leaf before trying gold leaf.
- If the piece will never be viewed back lit, you may be able
to get by with only one coat of leaf. However, it is recommended
that you apply at least two coats to eliminate the pinholes that
let the light through.
BACK to art of gold leaf kit
TOP of page


