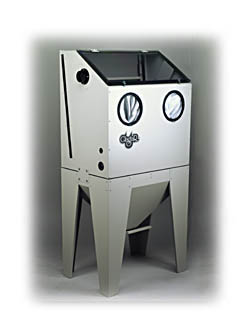
Your MiniPasser™ cabinet comes in two cartons so that it can be shipped by UPS. Assembly requires only a few basic tools and should take only 20 minutes to accomplish.
Before you start, carefully read through the instructions; locate all the parts and gather the following items:
- A medium flat-blade screwdriver
- An adjustable wrench or pliers
- A ten pound sledgehammer (just kidding!)
Find and Identify All Parts:
A. In the box marked "TOP," you will find:
- The top half of the cabinet
- The backrest for the easel
- The lower support bar for the easel
B. In the box marked "BOTTOM," you will find:
- The hopper assembly
- A box of parts composed of the following:
- Two side connector plates
- A goose-neck magnetic-base lamp
- Two flexible plastic glass shields with double-sided tape attached
- Two slot gaskets
- One rubber grommet
- One hole plug
- The following miscellaneous hardware:
- Eight 1/4-20 x 1/2" (6.35mm-20 x 12.7mm) hex head bolts to secure side-connector plates.
- Four 8-18 x 1/2" (4.09mm-18 x 12.7mm) self-tapping screws which are used to secure the hose adapter to the left side of the cabinet. The adapter is supplied with the vacuum.
Assembly Instructions For MiniPasser™
 In the following order, you should:
- Put the upper and lower halves together
- Mount the easel
- Mount the lamp
- Attach the window shield
1. To Put The Upper And Lower Halves Together
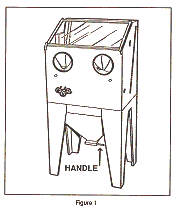
Make sure you have positioned the lower half with the handle on the hopper-trap door facing the front of the cabinet (See Figure 1).
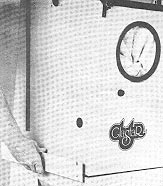
 Place the upper half of the cabinet on the lower half. Take the two side-connector plates and for 1/4-20 (6.35mm-20) hex head bolts and secure the plates to the lower half of the cabinet (See illustration at left). Place the upper half of the cabinet on the lower half. Take the two side-connector plates and for 1/4-20 (6.35mm-20) hex head bolts and secure the plates to the lower half of the cabinet (See illustration at left).
Put the bolts through the elongated slots in the connector plates and into the upper half of the cabinet. Do not tighten. With one hand, apply pressure to the top of the cabinet in a downward direction to compress the gasket between the two halves and tighten the two bolts. Do one side at a time.

2. To Mount The Easel
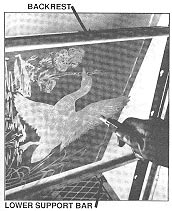
Install the lower support bar in any pair of key-shaped holes (See illustration at right). The back-rest bar is then installed in any pair of holes above the support bar.
3. To Mount The Lamp
Stick the magnetic base anywhere in the cabinet, and feed the line cord through the lower hole on the right side of the cabinet. Place the rubber grommet on the cord and slip it into the hole.
4. To Attach The Window Shield
Remove the release paper from the double back tape, and stick the window shield to the inside of the cabinet window.
TOP of page
Set-Up
Before using your MiniPasser™, read all instructions thoroughly and familiarize yourself with its safe operation.
Cabinet Stability
Rock-steady stability is especially important when you are working with very
large sheets of glass. It is a good idea to place the cabinet with its back
against a wall. Leave enough space on each side of the cabinet to allow for
the full length of the longest sheet of glass you anticipate using.
Use wedges under the legs to accommodate any unevenness in the floor.
Readjustment may be necessary if you move the cabinet. If the cabinet arm
holes are too low for you, put the cabinet on a wooden platform. If the arm
holes are too high, stand on a platform.
Vacuum Hook-Up
Attach the vacuum hose adapter (ferrule) that is supplied with the vacuum
over the 2 1/4" hole (5.715cm) on the side of the cabinet. Use the four
small hex-head self-tapping screws that come with the cabinet. A small
amount of silicone sealer applied to the base of the adapter will prevent
dust leakage.
Blaster Hose
The front holes on each side of the cabinet are for the blast hose. Most
right-handed people prefer the hose to enter from the right side, and vice
versa for "lefties." The hole that is not used should remain plugged. In
order to feed the hose through the hole, the nozzle-end assembly will have
to be removed. When replacing it, be certain that it is properly secured in
the hose before using the blaster.
Feed enough hose into the cabinet to make a loop. This will give you much more flexibility and freedom of movement than if you tried to constantly
adjust the hose length by pushing and pulling it through the hole. However,
the best solution to a stiff sand hose is to use a Glastar Flexible Hose Assembly. This will make your blasting much easier. See separate
instructions for Flexible Hose Assembly, if you are using it.
TOP of page
Using the Pass-Through Feature
4 feet (10.16cm) is the maximum length of glass that will balance on the
support rail if it is inserted through the cabinet, measured from one end of
the inside of the box. Any sheet longer than that must have additional
support under the far end of the glass sheet.
The foam used for the slot-gaskets will disappear "like magic" if you blast
directly at it. Keep your blast zone away from the gaskets to greatly extend
their working life. Also, the farther from the gaskets you blast, the less
abrasive leakage is likely to occur.
The foam slot-gasket is 3/4" x 1" (19.05mm x 25.4mm). When using the
cabinet for smaller pieces of glass which do not pass through the slots,
tuck the 1" (25.4mm) wide face of the foam gasket into the slot. When
blasting 1/8" (3.175mm) or 3/16" (4.7625mm) glass that pass through the
sides of the cabinet, tuck the 1" (25.4mm) face of the gasket between the
glass and the side of the slot to eliminate leakage. For 1/4" (6.35mm) to
1/2" (12.7mm) glass, use the 3/4" (19.05mm) face of the gasket.
When blasting flat glass (whether in a cabinet or not), it is a wise
practice to cover the back side with clear resist in order to prevent
inadvertently scratching or frosting an expensive piece of glass. Since the
foam slot gaskets pick up abrasive particles, it is especially important to protect the glass when using the pass-through feature. Consider it cheap insurance!
Lighting
The magnet-based lamp is designed to be moved about the inside of the cabinet to provide optimal lighting for any given situation. Run the cord to the outside of the cabinet through the lower hole in the right side of the cabinet. Leave enough slack inside the cabinet to allow the lamp to be placed anywhere in the cabinet without having the cord stretched across the work area.
Hint: Turn off as many room lights as possible when you are blasting. This will reduce reflections on the glass door and increase visibility.
Using the Easel
The easel is composed of two support bars that hook into one of the six holes on either side of the cabinet. The bar, which is "U" shaped, supports the glass, and the other flat bar is the back rest. If you are blasting a long piece which extends through the slots and is 24" (60.96 cm) high, the support bars should be in the very bottom set of holes and the back rest should be in the top set.
On the other hand, if you are blasting a small piece, for instance, a one-foot square (.0929 square meter), move the support bar up a couple of holes. Doing this will make your work easier to see.
If you are working on a three-dimensional piece, take the bars out of the cabinet.
TOP of page
Care And Maintenance
The MiniPasser™ Cabinet requires very little maintenance. The parts most commonly replaced are the plastic window shield, the door gaskets, the foam slot gaskets and the gloves.
Replacing The Mylar Glass Door Shield
Over time, the mylar shield inside the glass door will acquire a frosted surface as the result of abrasive ricocheting against it. The rate at which this occurs will depend on your individual blasting style, but it will need to be replaced on a regular basis. It is a good idea to keep a couple of spares on hand.
Remove the old shield and carefully clean the inside surface of the glass with glass cleaner. Use a lot of cleaner to flush the abrasive dust off the glass and blot it gently dry in order to prevent scratching. Remove the release paper from the tape on the new shield and press the shield into place.
Replacing The Door Gaskets
The gaskets are standard 3/4" wide x 1/2" thick (19.05mm x 12.7mm) light-duty foam weather-stripping, which is available at any hardware store. Pull off the section you want to replace, clean the surface, apply the replacement strip, and trim the ends flush.
Replacing The Slot-Gaskets
With care, the foam slot-gaskets can last for years. However, since the need for replacement could arise, it is wise to keep a replacement set on hand.
Replacing the Gloves
After a time, the gloves will wear out and will need to be replaced. They should be glued to the cabinet and held in place by the black rings.
Replacing The Glass Door
Do not attempt to replace the window with ordinary plate glass!! Replace with original factory parts.
TOP of page
- Important -
Safety Considerations For Sandblasting
Be certain that you follow carefully all the manufacturers' instructions for setting up your compressor, blaster, and vacuum. Double and triple-check everything before blasting, paying particular attention to connections, pressure gauges and valve settings.
BE SURE THAT THE CABINET IS CLOSED AND LATCHED BEFORE TURNING ON THE BLASTER!!!
The ball valves usually seen on pressure-pot blasters can reach the early stages of wear fairly quickly, and a small amount of leakage from the "business end" must be considered "normal." In other words, EVEN WHEN THE BLASTER IS "OFF," IT CAN STILL SPIT OUT ABRASIVE PARTICLES!! Treat the blaster as you would a gun: it is always loaded; so don't point it at anything you don't want blasted. It should be treated with respect and handled soberly.
When shutting down for the day, make sure that all power to the lights and vacuum is off, all air valves are shut off, and THE CABINET DOOR IS CLOSED AND LATCHED.
Respiration Protection
WEAR A DUST RESPIRATOR, especially when the cabinet is open or the abrasive is being recycled back into the pressure pot. A good respirator is a worthwhile investment - those little paper and rubber band masks are pretty useless for sandblasting. Because of
the danger of silicosis, never use sand as an abrasive. Either silicon carbide or aluminum oxide is safer, but there will still be silica dust generated by the abrasion of the glass itself, so always use your respirator.
Eye Protection
ALWAYS WEAR EYE PROTECTION, ESPECIALLY WHEN THE DOOR IS OPEN!!!
Hearing Protection
HEARING PROTECTORS are a good idea, too. Some exhaust systems are loud, and they usually stand right next to your ear. Earplugs are ok, but the earmuff types are more comfortable and easier to use. Hearing protectors have the added benefit of helping you focus on your work by filtering out the rest of the world.
Hand Protection
The cabinet comes with gloves. These give you the combination of protection, sensitive feel and secure grip that you need to blast. They really are an underrated link in the blasting system as far as comfort and endurance are concerned.
These are standard precautions that should be observed no matter
what type of cabinet you are using.
BE CERTAIN THAT YOU, YOUR EMPLOYEES, AND ALL OTHERS WHO HAVE ACCESS TO YOUR SANDBLAST FACILITY FULLY UNDERSTAND THE SAFE OPERATION OF YOUR EQUIPMENT!
If you have any questions, comments or suggestions regarding your
sandblast cabinet, please don't hesitate to contact Glastar.
BACK to MiniPasser™ main page
TOP of page
| 


