|
To print out this manual: click the PRINT icon at the top
of your browser window or select print from the file menu.
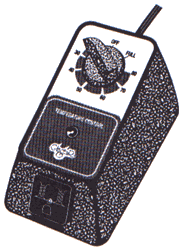
GLASTAR
SOLDERING IRON CONTROL

This control slows down
the flow of electrical power to the iron lowering it to a more manageable
60 watts. Handling up to 1800 watts, this energy-efficient regulator
makes it easier for you to control the termperature of any standard
soldering iron.
OPERATING INSTRUCTIONS FOR STAINED GLASS
WHY DO YOU NEED A SOLDERING IRON CONTROL?
50/50 solder melts at
420° and lead melts at 620° and whether you have a 40 watt
iron or a 400 watt iron, if you plug it in and leave it for 20 minutes,
the tip temperature of your iron will go over 900°. Now, if you
touch that iron to your lead, you're definitely going to have a problem...
a big hole in your lead! If you use the Glastar Soldering Iron Control
correctly, the problem will disappear instead of your lead.
A POPULAR MISCONCEPTION
This control (just like every other
unit on the market) does not control the temperature of your iron.
It controls the power to the iron...YOU control the temperature to
the iron by first finding the right temperature as it heats up; then
soldering at a consistent rate so that the iron does not overheat.
Here are a set of rules to go by when using your control. Follow them
carefully, and you will never have a problem with burned lead.
HOW TO FIND THE PROPER SOLDERING TEMPERATURE
AS THE IRON HEATS UP
- Cut a 6" (15.24
cm) piece of 3/8" (9.525mm) or 1/4" (6.35mm) flat lead
(don't use round lead), and also a 6" (15.24cm) piece of solder.
Flux one side of the lead and lay the solder on top of the lead.
- Plug your iron into
the control, and set the control to FULL and wait approximately 2
minutes.
- Now place a flat
face of the soldering iron tip on the solder, and hold it firmly
against the solder and lead for FIVE FULL SECONDS.
- If the solder melts
rapidly and flows out to form a nice, smooth puddle and yet, you
don't burn a hole in the lead (having applied it for the five full
seconds), your iron has reached the right temperature. If not, read
A & B.
- If the iron
melts slowly thru the solder or the puddle of solder is mushy
(rather than liquid), your iron is still too cool. Wait 20
seconds and try Step 4 again (for a 140 watt or larger iron,
it may require 6 or more minutes). If it is still too cool,
keep repeating the 20 second wait until you are successful
in Step 4.
- If, on the
initial test you burned thru the lead, turn your control to
OFF and wait 20 seconds and test again. If it is still too
hot, keep repeating the 20 second wait until you are successful
in Step 4.
|
SOLDERING IRON WATTAGE |
CONTROL SETTING |
| 80 Watts |
75
|
| 100 Watts |
60
|
| WELLER W-100 |
CONTROL NOT REQUIRED
|
| 120 Watts |
50
|
| 150 Watts |
40
|
| 175 Watts |
35
|
| 200 Watts |
30
|
| 300 Watts |
20
|
TOP of page
HOW TO KEEP THE IRON
AT THE PROPER TEMPERATURE AS YOU SOLDER
Having attained the
proper temperature, now turn the control to the number indicated on
the chart. The setting on the control depends on the wattage of your
iron.
As soon as the number
is set on the control, start soldering your project. you don't have
to hurry, but don't linger between solder joints. KEEP MOVING ALONG
AT A STEADY PACE. What if the phone rings as you're soldering, and
you have to put the iron down for a few minutes? Turn the control to
20 when you leave, but when you return don't touch the iron
to your project. Repeat the test in Step 4 first. It may have become
too hot during your absence. Once you have the iron back to the right
temperature, turn your control to the proper setting and continue soldering.
After you have been soldering for a few minutes, you may have the feeling
that the iron is either too hot or too cool. Despite your inclination, DON'T
TURN THE CONTROL UP OR DOWN...leave it alone, calm yourself, and
follow these steps:
- If you think the
iron is too hot, go back to the 5 second test in Step 4. If it is
too hot, try to increase your soldering speed.
- If you think the
iron is too cool because your solder joints are a bit lumpy, lay
the iron down for 20 seconds. Then start soldering again. You may
be trying to solder too fast, or you may not be leaving your tip
down on the lead long enough. The tip should be in contact with the
lead for approximately 2-3 seconds to get the lead hot enough to
accept the solder.
WHAT HAPPENS AS YOU
GAIN EXPERIENCE?
After you've completed
several projects and have had several hours experience soldering, you
will find that your soldering speed has increased considerably. When
you find you must stop several times during a project to let your iron
heat up, change the setting on your control. Increase the setting by
10's until you can maintain the correct temerature for your rate of
soldering.
WARRANTY
This Soldering Iron Control
is warranted against failure for 1 year from the date of purchase. If it
should fail during that period, just retun it to your dealer with proof
of purchase date and it will be exchanged for a new unit.
To register this product, click here
ELECTRICAL INFORMATION
Type of Control: Bimetal Regulator
Voltage: 120 Volts
Maximum Current: 15 Amps
Maximum Load: 1800 Watts
TOP of page
|


